We will get images which are same size as the following preview from a video stream.
AVFoundation is a framework to control audiovisual media on Apple platforms. Camera and preview of video stream from it can be implemented by the framework.
Here, I want to show how to do it.
These are three files we will create.
- CameraViewController.swift
- Preview.swift
- Camera.swift
They are implemented without any 3rd-party libraries. So just copy-paste is enough to run them.
Camera.swift
Camera class is defined in Camera.swift. This controls device's camera. In the following code, deviceInput is added to capture session to get video data from a camera and videoDataOutput is added to processing the image buffer (called CMSampleBuffer).
Strictly, CMSampleBuffer represents some media types not only images.
Camera.swift1import AVFoundation2import UIKit34final class Camera {5 let captureSession = AVCaptureSession()6 private let captureSessionQueue = DispatchQueue(label: "captureSession")78 private var captureDevice: AVCaptureDevice?910 private let videoDataOutput = AVCaptureVideoDataOutput()11 private let videoDataOutputQueue = DispatchQueue(label: "videoDataOutput")1213 init() {14 captureSessionQueue.async { [weak self] in15 self?.setupCamera()16 }17 }1819 func setupCamera() {20 guard let captureDevice = AVCaptureDevice.default(.builtInWideAngleCamera, for: .video, position: .back) else { return }2122 self.captureDevice = captureDevice23 captureSession.sessionPreset = .hd1280x7202425 guard let deviceInput = try? AVCaptureDeviceInput(device: captureDevice) else { return }2627 guard captureSession.canAddInput(deviceInput) else { return }28 captureSession.addInput(deviceInput)2930 guard captureSession.canAddOutput(videoDataOutput) else { return }3132 captureSession.addOutput(videoDataOutput)33 videoDataOutput.connection(with: .video)?.videoOrientation = .portrait34 }3536 func startSession() {37 if !captureSession.isRunning {38 captureSession.startRunning()39 }40 }4142 func setSampleBufferDelegate(_ delegate: AVCaptureVideoDataOutputSampleBufferDelegate) {43 videoDataOutput.setSampleBufferDelegate(delegate, queue: videoDataOutputQueue)44 }45}46
Preview.swift
Preview, a subclass of UIView, is defined in this file. The most important thing is the line of override class var layerClass. AVCaptureVideoPreviewLayer class is required to display preview of video stream.
Preview.swift1import AVFoundation2import UIKit34final class Preview: UIView {5 var videoPreviewLayer: AVCaptureVideoPreviewLayer {6 guard let layer = layer as? AVCaptureVideoPreviewLayer else {7 fatalError("Set `AVCaptureVideoPreviewLayer` type for Preview.layerClass.")8 }910 layer.videoGravity = .resizeAspectFill11 return layer12 }1314 var session: AVCaptureSession? {15 get {16 videoPreviewLayer.session17 }18 set {19 videoPreviewLayer.session = newValue20 }21 }2223 override class var layerClass: AnyClass {24 AVCaptureVideoPreviewLayer.self25 }2627 override init(frame: CGRect) {28 super.init(frame: frame)29 configure()30 }3132 required init?(coder: NSCoder) {33 super.init(coder: coder)34 configure()35 }3637 private func configure() {38 translatesAutoresizingMaskIntoConstraints = false39 }40}41
CameraViewController.swift
Start implementing previewing video stream. There is nothing difficult, just using the classes we defined previously.
CameraViewController.swift1import UIKit2import AVFoundation34final class CameraViewController: UIViewController {5 private let preview: Preview = .init(frame: .zero)6 private let camera = Camera()78 init() {9 super.init(nibName: nil, bundle: nil)10 }1112 required init?(coder: NSCoder) {13 fatalError()14 }1516 override func viewDidLoad() {17 super.viewDidLoad()18 configure()19 }2021 override func viewDidAppear(_ animated: Bool) {22 super.viewDidAppear(animated)23 camera.startSession()24 }25}2627private extension CameraViewController {28 func configure() {29 view.addSubview(preview)30 view.topAnchor.constraint(equalTo: preview.topAnchor).isActive = true31 view.leadingAnchor.constraint(equalTo: preview.leadingAnchor).isActive = true32 view.trailingAnchor.constraint(equalTo: preview.trailingAnchor).isActive = true33 preview.heightAnchor.constraint(equalToConstant: 200).isActive = true34 preview.session = camera.captureSession35// camera.setSampleBufferDelegate(self)36 }37}38
What if you want to process images from a camera, how do we perform that? To do this, setSampleBufferDelegate is needed. Remove the comment in the code above. After that, add the following delegate method.
CameraViewController.swift1extension CameraViewController: AVCaptureVideoDataOutputSampleBufferDelegate {2 func captureOutput(_ output: AVCaptureOutput, didOutput sampleBuffer: CMSampleBuffer, from connection: AVCaptureConnection) {3 guard let pixelBuffer = CMSampleBufferGetImageBuffer(sampleBuffer) else { return }4 let ciImage = CIImage(cvPixelBuffer: pixelBuffer)56 DispatchQueue.main.async { [weak self] in7 guard let self = self else { return }89 let bounds = self.preview.bounds10 let uiLowerLeft = bounds.origin11 let uiLowerRight = CGPoint(12 x: bounds.width,13 y: uiLowerLeft.y14 )15 let uiUpperRight = CGPoint(16 x: bounds.width,17 y: bounds.height18 )1920 // supports only portrait mode21 let videoLowerLeft = self.preview.videoPreviewLayer.captureDevicePointConverted(fromLayerPoint: uiLowerRight)22 let videoUpperLeft = self.preview.videoPreviewLayer.captureDevicePointConverted(fromLayerPoint: uiLowerLeft)23 let videoLowerRight = self.preview.videoPreviewLayer.captureDevicePointConverted(fromLayerPoint: uiUpperRight)2425 let uiOrigin = CGPoint(x: videoLowerLeft.y, y: videoLowerLeft.x)26 let uiSize = CGSize(27 width: videoUpperLeft.y - videoLowerLeft.y,28 height: videoLowerRight.x - videoLowerLeft.x29 )3031 let uiCroppingRect = CGRect(32 x: ciImage.extent.width * uiOrigin.x,33 y: ciImage.extent.height * uiOrigin.y,34 width: ciImage.extent.width * uiSize.width,35 height: ciImage.extent.height * uiSize.height36 )3738 let context = CIContext()39 if let bitmap = context.createCGImage(ciImage, from: uiCroppingRect) {40 // processing this bitmap41 }42 }43 }44}45
After some coordinate transformation, you can process image has same size as preview in the line I commented //processing this bitmap.
There is a big difference between UIKit and AVFoundation in terms of coordinate system. The system of UIKit is as you know. In AVFoundation, {0,0} represents the top left of the picture area, and {1,1} represents the bottom right in landscape mode with the home button on the right
Without this process, the size of processed image become larger. It has original size. The following picture shows overview.
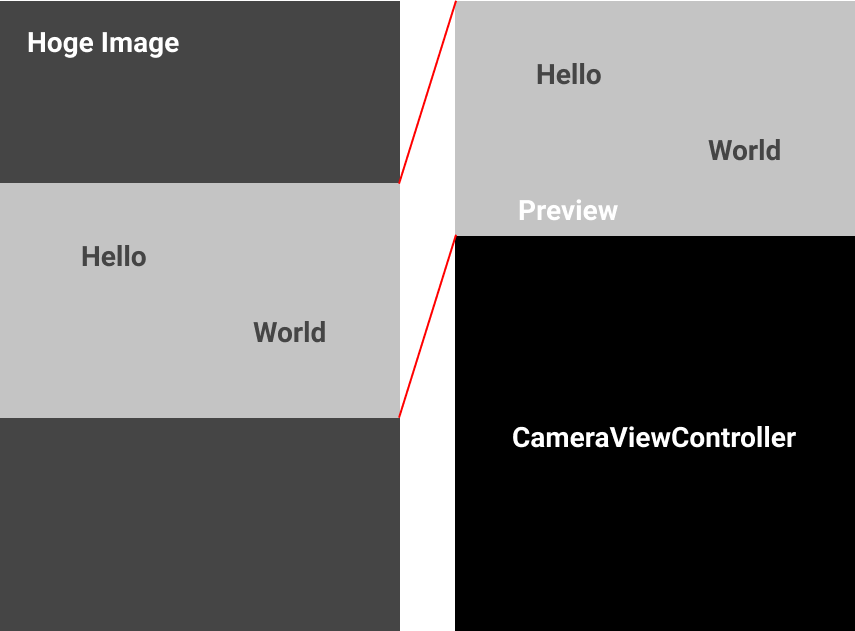
Hoge Image is the input image of video stream in a certain moment. Preview displays the area of light gray in Hoge Image. To get the area of preview exactly, the above coordinate transformation was needed.